The Advantages of Developer Options and USB Debugging Functions You Should Know
As an operating system that open source, Android certainly has a very large community support. With features "Developer Options" (Developer Options) on every Android-based device, you or your developer will be encouraged to be involved in the process of developing the Android operating system itself.
Arguably, these "Developer Options" are at the core of Android development. This "Developer Options" contains a number of advanced features, one of which allows you to gain access to the Android system and perform various modifications. For those of you who like to hack Android, of course, you are already familiar with USB Debugging no? What are the features that you can activate through "Developer Options"? And what are its functions?
- 4 Things You MUST Know Before Becoming an Android Developer
- How to Bring up Developer Options on Android
- Change New HP? Here's How to Restore Data and Apps on New Android
How to Enable USB Debugging
What is USB Debugging

Just like his name, USB Debugging is an option debugging which can be accessed using the USB function on Android and PC. So, the main function of USB Debugging is to build a bridge between Android device and PC. With that, the developer Applications can use this process to test software and find problems using Android SDK (Software Development Kit).
Furthermore, USB Debugging is also used by developer or Android users to help with tasks like installing custom recovery, root, install custom ROMs, and much more. In short, for the need to get Super User access in every process root, USB Debugging mode needs to be enabled so that the files needed for Super User access can be accessed.injection into the system.
Features of Developer Options

Back again to "Developer Options", this feature is really needed for developer Android applications, hackers, or for those who like to hack Android to access and control their devices from a PC. In fact, for those of you who are just ordinary users and want to do root, install a custom ROM or modify the Android system. A lot of tools which you can use in "Developer Options", starting from Debugging, Networking, Input, Drawing, Hardware accelerated rendering, Monitoring, and other advanced application settings.
How to Enable USB Debugging?
As Jaka alluded to above, to activate USB debugging, you must first activate Developer Options on Android. This feature is hidden default and you have to make it available by doing the following steps.
- Open menu Settings >About on your Android smartphone or tablet.
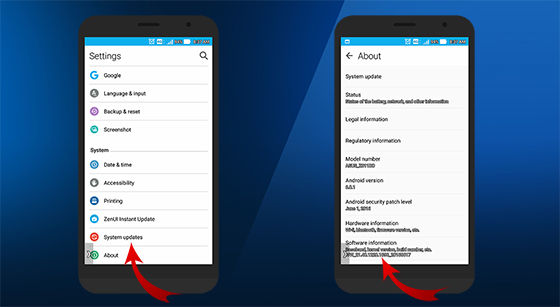
- Next scroll to section Build Number and press up to 7 times.
- After pressing Build Number 7 times, you will see a message "You are now a developer" or "Developer mode has been enabled".
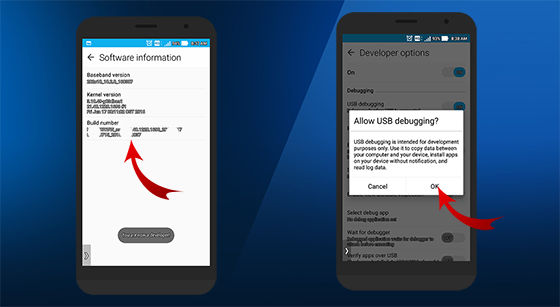
- Now back to the main menu Settings and you will see menu Developer Options or "Developer Options" on your smartphone.
- Next, open the Developer Options menu and enable USB Debugging.


So, it's done. Now your Developer Options and USB Debugging are active. Now you are ready for action. By using this you can control your smartphone remotely via a computer.
However, it's a good idea to only enable USB Debugging when needed. If you leave it in an active state, it's like you leave the door of the house wide open. Yes, this has the potential to create a security hole, where third parties can further access your Android system. They can install malware, tap, or steal important data. At this point, is there anything you would like to add or ask? Please pin your opinion in the comments column.