For Android, which may still have internals between 4GB to 16GB, sometimes they have problems when they want to install new applications, namely "your storage device is full" which means your internal memory is full.
In modern times, we often find Android with a fantastic internal memory capacity. We often hear from 16GB to 128GB on various advanced Androids, but for Androids that may still have less than 16GB internals, sometimes they have problems when they want to install new applications, namely "Your storage device is full" which means your internal memory is full.
But wait, if you feel that you only install a few applications, there is only one game, you must be confused. This obstacle is often heard or even we are one of the victims. On this occasion, I will discuss the solution storage Android is full even though there are few applications. Here are 6 powerful ways to relieve storage Fully stocked Android.
- How to Save 8 GB of Android Memory
- Full Android Memory Solution Even If You Don't Install Many Applications
These are 6 Effective Ways to Free Up Android Storage that is Already Full
Before doing the way to relieve storage The full Android below, it would be nice for you tobackup some important files from internal memory to external memory or SD Card. This is only an optional step, because it is feared that some important files will also be deleted.
How to Backup Files to Memory Card
- Open File Manager on your phone.

- choose internal storage.

- Move files that you think are important to external storage or memory card.

It's done. Now you can safely drain the contents storage Your Android is already overloaded. Here are the steps:
1. Delete all files in the .thumbnails folder
The first tip for relief storage Full Android is to delete all files in the folder thumbnails. This folder often appears as backup or cache from the photos we take or what we see. And sometimes this folder takes up quite a lot of space and can cause storage full so you just delete it.
- Enter internal storage again with File Manager on your Android then select internal storage and enter the DCIM or Picture folder

- Next you enter the folder .thumbnails and delete all the files in it.

2. Clear cache files from all apps
Cache is a file that is temporary but sometimes takes up quite a lot of space in our internal memory, which results in full internal memory. The way to fix it, you can just clean up cache of each application one by one, but it will take a lot of time so I will provide an application that can help you clean up cache.
- Download app App Cache Cleaner before.
 Apps Productivity INFOLIFE LLC DOWNLOAD
 - After you download you open the application and click "Start".

- Then you just click Clear All so that all cache lost and make your internal memory wider.

3. Move apps to SD Card
Moving applications to the SD Card can provide more space on the internal memory and is a solution storage Android is full because the application will be stored on the SD Card which causes the expansion of free space in the internal memory.
- Go to settings then select Apps, or sometimes called App Manager.

- Next you select which application you want to move to the SD Card, then select "Move to SD Card".

4. Turning SD Card So Media To Increase Internal Memory Capacity
This fourth way is very effective for relieving storage Full Android, but you must have access root to do it. This fourth method is not recommended if you still have a warranty because root result in loss of warranty. The benefit of this repartition is that we can determine how much memory we will use to become storage media that supports internal memory so that the applications we want to install can be more.
Need to be reminded, we are not responsible if something untoward happens to your Android. But I myself have tried it and the results are satisfactory.
The conditions for doing so are:
- SD Card with a size above 4GB and Class above 4. Actually for a 2GB SD Card it is also okay but not recommended.
- Android that has beenroot.
- Download the Aparted app
- Do backup on the files on the SD Card. This is optional but I highly recommend it because there is a step where we are required to format the SD Card which causes all files to be lost.
The steps:
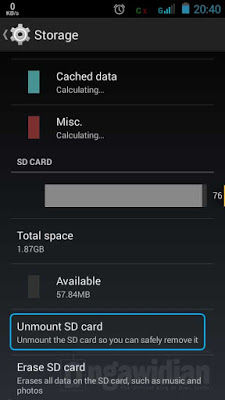
- Enter menu Settings then select "Storage"

Next you look for your SD Card then Unmount SD Card. You can also do Erase first if you want.
After you do Unmount SD Card, then just open the Aparted application that you downloaded earlier and press the green button three times to create three partitions. Actually two is enough but the third one is for Swap Ram.


- Once you've split it into three, you'll need to change each system partition to FAT32, EXT2, and SWAP. After that you can start adjusting the size of each partition that you create by sliding the circle on each partition. Here are some suggestions for the size of each partition depending on the user whether the second partition is large or small, but if you use Link2SD, you don't need to make it too big. But if you use Mounts2SD you have to make it big.
16GB MicroSD: FAT32 (10GB), EXT2 (5GB), SWAP (256MB)
8GB MicroSD: FAT32 (4GB), EXT2 (3.3GB), SWAP (256MB)
Microsd 4GB: FAT32 (1.7GB), EXT2 (2GB), SWAP (128MB)
2GB MicroSD: FAT32 (500MB), EXT2 (1.4GB), SWAP I don't think is necessary.
- After you set it you just press the button Apply Change.

It doesn't end there, then you have to do it link between internal memory and SD card.
5. Using Link2SD
With link2sd you will store the application internally but the data will be stored on the 2nd sd card partition.
Download the Link2SD application.
 Apps Productivity Bülent Akpinar DOWNLOAD
 Open the application, there will be a notification that the second partition has been detected and will create script.
When finished, you just click Multi-select options.
 Apps Productivity Bülent Akpinar DOWNLOAD
- Click Select All if you have a lot of applications so it's not complicated.

- Click Options again then select Create Link.

- Check all options and select OK.

That way some of the data from your application will be stored in the 2nd partition and the effect of expanding the internal memory, so you can install more games. At the most to be more optimal, it is recommended to do reboot on Android after doing so, because sometimes there are apps that forced close, but after reboot the application will run normally.
6. Using Mounts2SD
By using Mounts2SD your application will be stored on the SD Card by 90%, so it only takes up little space on the internal. Here I use the EX3 partition to make sure both, if you already use the EX2 you can replace it in Aparted, even though EX2 can sometimes be used.
- First, first install the Mounts2SD application. Install and open the application then click the option button then Application Settings.

- Click install Startup Script

- Exit Settings, move to the second tab then look for Applications, Libraries, Data, and Dalvik Cache and check the list.

- Find Driver again and select the second partition that we have created. Here as an example using EXT3 you can also use EXT2, after you're done living reboot your android.

- This is the result:

- After this you don't need to do link again because the application will be automatically installed to the second partition.
With the five ways above then storage Android that was previously full will be wider and ready to be filled with new applications. However, it is possible that later your internal memory will be full again. To anticipate it, you better buy a new Android phone with a super large internal memory like 128GB, then all your complaints about full memory will be lost.