This time ApkVenue will explain to you how to easily install Phoenix OS on PCs and Laptops. Come on, see the description below.
There are a lot of smartphone users in the world and the fact is that people spend more time on their phones than on their PCs. Well, Android smartphones are among the ones most used ranks first. Despite being hit by many issues, Android's performance has never been the least bit disappointing. Even now Android has been developed so that it can run on a computer system, the development is called Android Android-x86 Project.
Currently the Android-x86 Project has given birth to a new OS that more stable, specifically for desktop computer devices that user-friendly, the OS is named Phoenix OS. Well, quoted from the site makeusof, this time Jaka will explain to you how to install Phoenix OS on PC and Laptop easily. Come on, see the description below.
- How to Play Mobile Legends on PCs & Laptops Without Slow, Push Rank Beat Up!
- 7 Ways to Play Mobile Legends for Beginners, Solo Rank to Mythic!
- 8 Ways to Get Free Skin Mobile Legends: Bang bang
How to Install Android on PC and Laptop Without Emulator
Terms Before Installing Android Phoenix OS
1Hardware Requirements
Phoenix OS requires an x86 processor to run smoothly, either made Intel or AMD. But the most recommended is the processor Intel Atom. The following is the minimum hardware requirements required.
Storage Capacity minimum 2GB.
Intel or AMD processor made in year 2012 and up. Intel Atom processor is recommended.
USB Flash Drive 8GB (For Phoenix OS Boot Media).
USB Flash Drive 1GB (For GParted)
2.UEFI Or Motherboard BIOS?
Legacy computer systems made in 2010 and below still use the system I/O BIOS as a Power On Self Test (POST). So before the computer enters the operating system, it will first be checked by the BIOS for several installed hardware components, making it impossible for the operating system to work. without BIOS. However, now the latest computer system replaces the BIOS with a new technology called Unified Extensible Firmware Interface (UEFI), this technology is claimed to be more reliable and safer than the BIOS.
Unfortunately, Phoenix OS doesn't support with the UEFI system. However, don't worry because we can configure UEFI to work with any softwareNon-Windows operating system. Come on, keep reading.
How to Install Phoenix OS
Step 1. Download Phoenix OS

Phoenix OS installation package is available for version 32-bit and 64-bit. So we can install it on the old or newest computer as needed. You can download Phoenix OS via the official website as shown above.
Step 2. Make Phoenix OS Bootable USB to Flash Drive
Once the download of the Phoenix OS installation package is complete, the next step is to create Phoenix OS bootable USB using the Rufus app. When finished downloading Rufus, then open the application.

First, select USB Drive that you want to use. Second, select the MBR Partition Scheme for BIOS or UEFI option. Third, select the FAT32 file system. Fourth, you can mark options for Quick Format, Create a bootable image using, and so on as shown in the picture above. Then finally select the Start button.
Step 3. Configure BIOS/UEFI

There are three things to configure in BIOS/UEFI before installing Phoenix OS. Each vendor generally has a different BIOS/UEFI display different but the function remains the same. Here are the settings you can change in the BIOS/UEFI.
1. Activate Legacy Mode Features If possible.
2. Select Feature Windows 7 Mode or Linux Mode if applicable.
3. Turn off features Fast Boot and Secure Boot if any, because both features are designed for Windows computers while Phoenix OS is a Linux-based operating system.
If the settings above have been completed, then the last step is that you can change boot mode to be redirected to the USB Flash Drive containing the Phoenix OS installation package.
Step 4. Create an Installation Partition (Optional)
There is two types of partition namely GPT and MBR. On the latest computers usually use the GPT type which is the default partition. Therefore, we have to change the partition type from GPT to MBR first. It is also because of the type MBR partition support for all kinds of operating systems.
The first way is to download the GParted application first, when finished then make USB bootable that contains the application. Then change the BIOS initial reading to a USB Drive and insert the Flash Drive containing the bootable from the app Gparted the.
If successful, an image like the one below will appear.
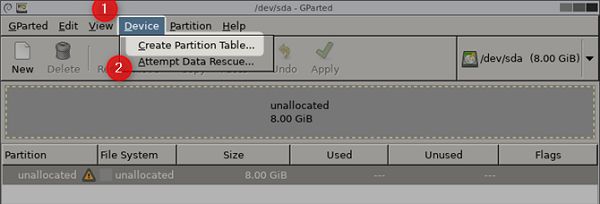
Click Device then select Create Partition table.
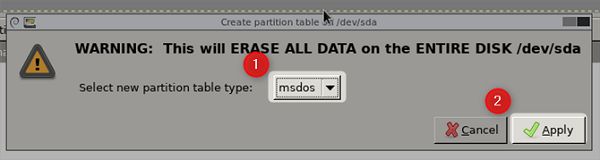
After that select the type of table partition to be selected, just select it msdos. After that click Apply to end.


Step 5. Phoenix OS Installation Preparation
Phoenix OS installation process very easy. First, insert the installation USB Flash Drive into the computer and select the BIOS initial boot from the Flash Drive.
- If it appears as shown below, then select Installation.

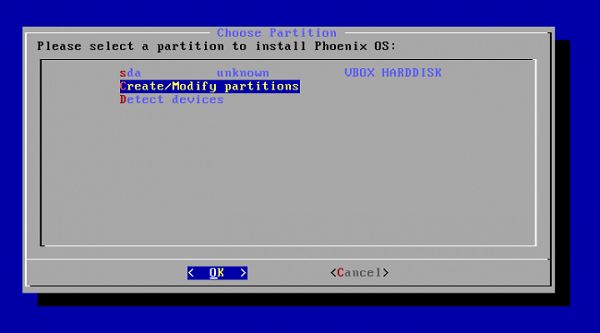
After the next menu page appears, select Create/Modify Partitions.
If you encounter any questions Do you want to use GPT? Just choose No. As we discussed earlier, the Phoenix OS operating system does not support this type of partition.
If a menu page appears as below, you can use arrow keys on the keyboard for navigation.
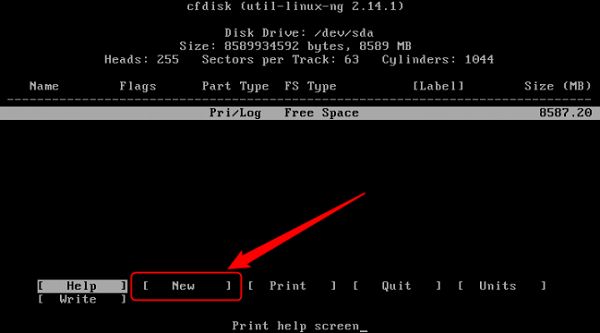


First, swipe to options New then press enter, the selection will create a new partition named sda1. Second select option Primary to make sda1 the default partition. Third select sda1 to be the partition used for selection bootable. Do not press enter more than once on the bootable option because it will remove the boot flag in Flags.

- After completing the command above, the last step is to select the option Write to end and save settings. If there is a request question Are you sure you want to write the partition table to disk? Then just write the command Yes on the screen and enter to end. When finished then select the button Quit.
Step 6. Install Phoenix OS to the Created Partition
choose sda1 and press enter.
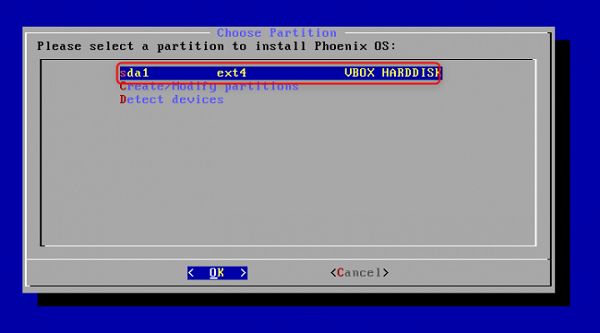
On the menu Choose filesystem, choose ext4 as the default filesystem.

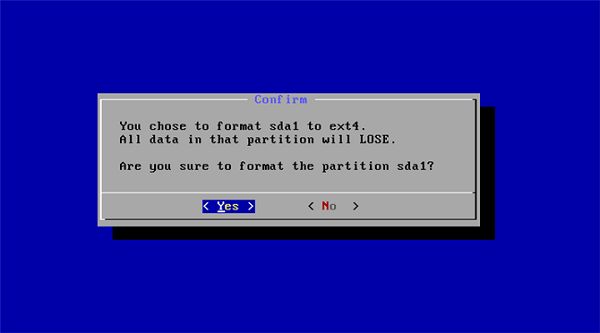
If a confirmation screen appears then click Yes to end.
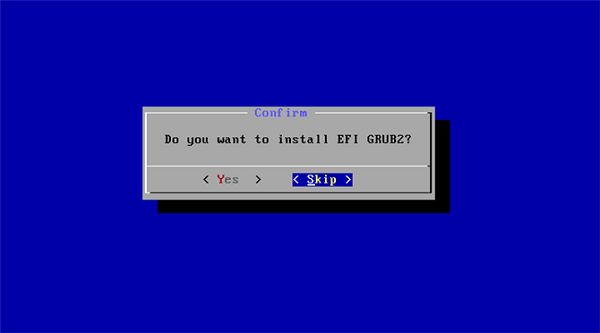
If a confirmation screen appears to install EFI GRUB2. Then just press the button Skip.
Then a confirmation question screen will appear Do you want to install the GRUB boot loader? Just choose Yes. This process is the last and will continue to the installation process.


After the installation process is complete, a page like the image below will appear. You can choose to run Phoenix OS directly by selecting Run Phoenix OS or Reboot. If you choose Reboot, then don't forget to unplug the Bootable USB Flash Drive that is still plugged in the computer. FINISHED!

 Phoenix OS is an operating system based on Android Nougat designed for... desktop computer. Phoenix OS also offers features Snap which allows the user to slide the window to the left or right of the screen. The Snap feature allows Phoenix OS to function in dual-windows mode (Split screen). Wow, cool!
 How guys, are you interested in installing Phoenix OS to your PC or Laptop device? If you have any questions, please write your opinion in the comments column below.